
Now, this is something I do in order to work the rest of this area a little easier.
Let's stop with the body for a bit and work on the hands and arms.
1. Ch 2.
2. Add 4 sc in the 2nd ch. [4]
3. *2 sc (inc) in the next 1 sc* and repeat in the next 3 sc. [8]
4.Sc in the next 3 sc and * 1 triple crochet (tc) in the 4th sc (to make a thumb) and 1sc in the last 4 scs. [8]
* this optional if you feel like just keeping the tc out.
5. Dec in the first st and 1 sc in the next 4 st and dec in the last 2 st. [6]
6. 1 sc in the next 6 st for 5 rows [6]
7. Refer to Photo F and G.
8. This is one way to make the hand and arms.
9. For those who have arthriris and love to crochet in less pain, I will cover another simpler way to make them.
Let's fining the chest by adding our colored yarn for the top. (The colored yarn will be added to the arms later by the 2nd technique below.)
1. Starting with your different colored yarn for the dress, 1 sc in the next 18 st. [18]
2. Work 4 more rows, [18]
3. I am using a DK yarn and it looks way smaller but use what you have and add your total of 5 rows. I like the petite charm.
Now the arms are attached to the body. Yippee.
Keep going.....Because now you need to add the head to the body.
Refer to Photos L and M.
Please enjoy this session. You may embellish as much as you like. This is your project. Looking forward to seeing your work. Happy Crocheting! Valis
Welcome back to the Little Pigtail CAL.
After adding the shoes and build up to the connection of the legs, the picture tutorials will help in showing the
body process.
After adding the shoes and build up to the connection of the legs, the picture tutorials will help in showing the
body process.
 |
| Photo A. 5 rows of 24 sts make the trunk. |
The first picture shows how the 2 legs are completed and connected.
- 1. There is a total of 24 stitches per row.
- 2. From the Part 2 24 sts were already created when the 2 legs were connected.
- 3. Go ahead and work a total of 5 rows each having 24 sts. See photo A.
 |
| Photo B. Dec to 18 inc on this row. |
The second picture show that the 5 rows are completed.
Now to begin decreasing up to the chest.
- 1. After the 5 rows done, *1sc in the next st and dec in the next st* repeat 5 times around.. [18]
- Refer to Photo B.
The next row will be the building of the chest.
- For the next 3 rows, sc in the 18 scs.
- Refer to Photo C.
 |
| Photo C. Adding the next 3 rows of 18sts. |
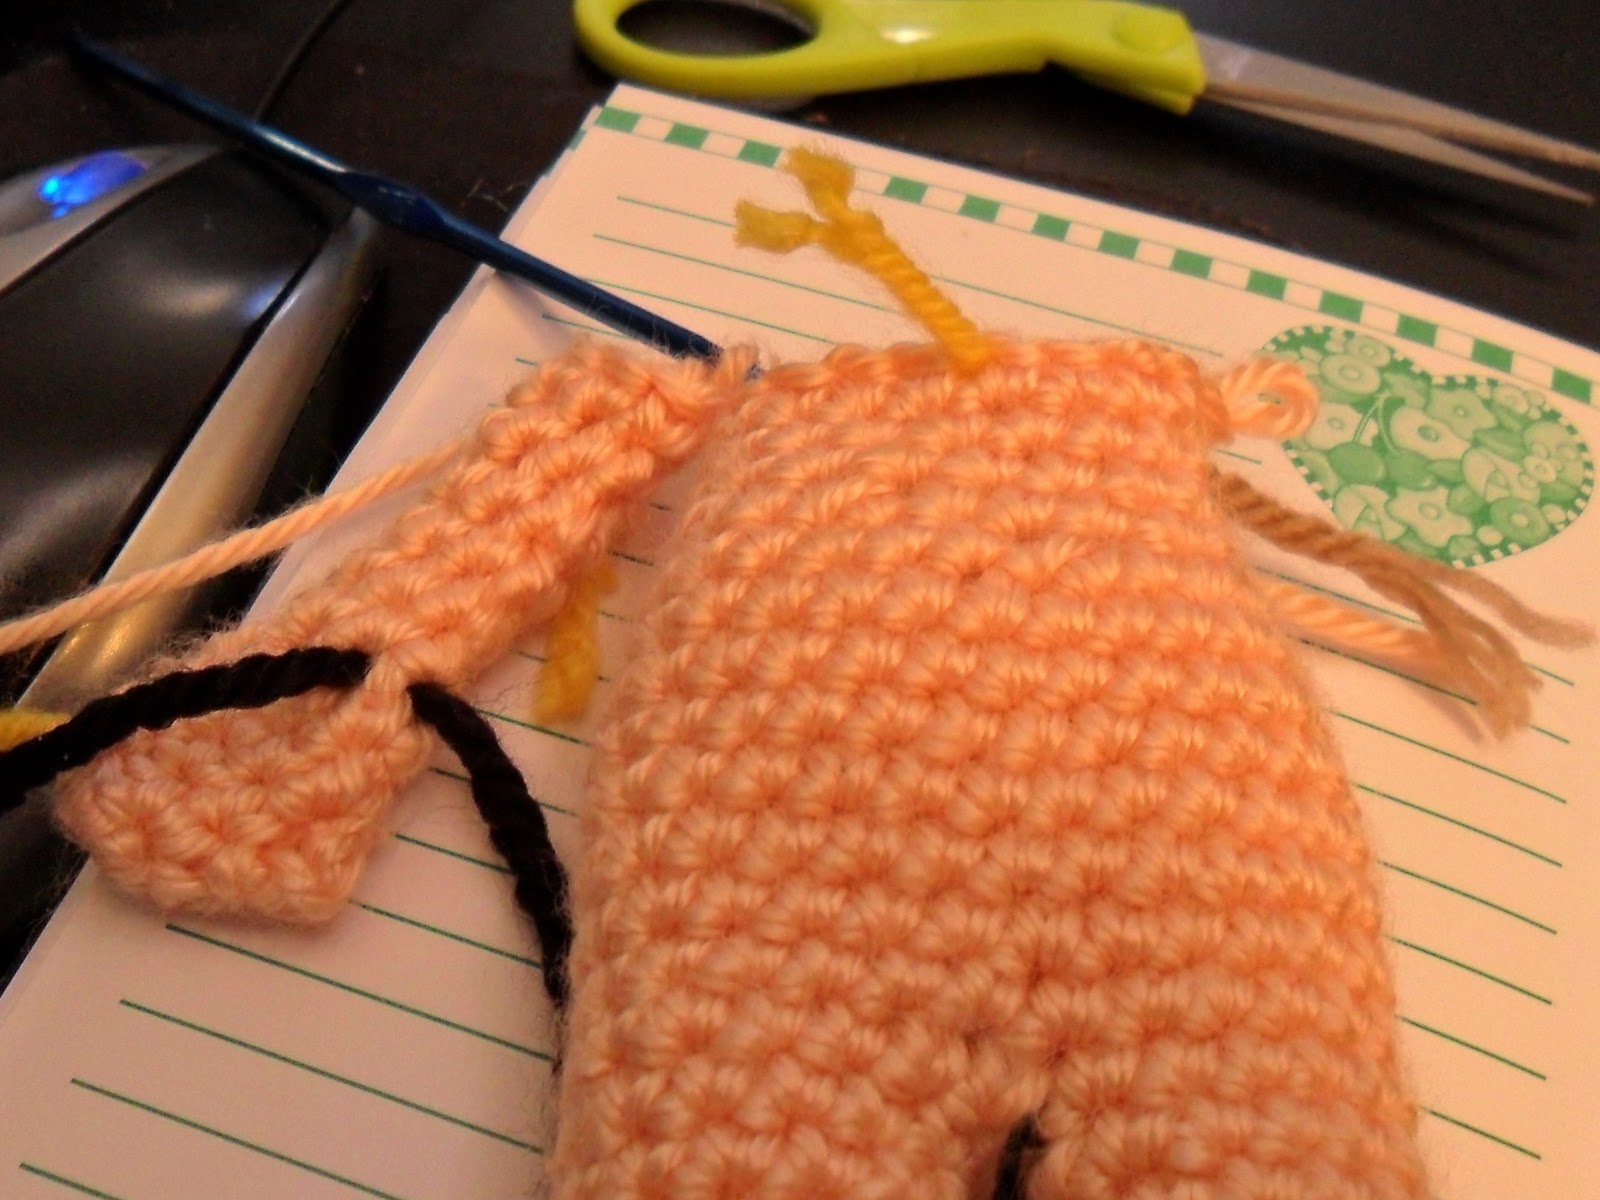
Now, this is something I do in order to work the rest of this area a little easier.
-
- From the yellow marker to the tan marker
- 1 sc to the next 4 sc and that becomes the beginning stitch.
- Refer to Photo D.
 |
| Photo D. Making a new beginning st. |
 |
| Photo E. Making the hand. |
1. Ch 2.
2. Add 4 sc in the 2nd ch. [4]
3. *2 sc (inc) in the next 1 sc* and repeat in the next 3 sc. [8]
4.Sc in the next 3 sc and * 1 triple crochet (tc) in the 4th sc (to make a thumb) and 1sc in the last 4 scs. [8]
* this optional if you feel like just keeping the tc out.
 |
| Photo F. View of the making of the hands in the round. |
6. 1 sc in the next 6 st for 5 rows [6]
7. Refer to Photo F and G.
8. This is one way to make the hand and arms.
9. For those who have arthriris and love to crochet in less pain, I will cover another simpler way to make them.
 |
| Photo G. Looking at how the hand and arms look like to the body. |
 |
Photo H. Adding the dress for the chest. |
1. Starting with your different colored yarn for the dress, 1 sc in the next 18 st. [18]
2. Work 4 more rows, [18]
3. I am using a DK yarn and it looks way smaller but use what you have and add your total of 5 rows. I like the petite charm.
 |
| Photo I. Adding the 3 rows of dress yarn. |
 |
| Photo J. Making the hand back and forth vs. in the round. |
This is the arm done differently.
1. Ch 5 and turn.
2. 1 sc in the next 4 ch. Ch1 and turn. [4].
3. *2 sc (inc) in the next sc* and repeat in the next 3 sc.Ch1 and turn. [8]
4. 1 sc in the next 3 st, tc in the 4th st, and 1 sc the last 4 sc. Ch 1 and turn. [8]
5. Dec in the 1st sc, 1 sc in the next 4 sts, dec in the last 2 sc. Ch1 and turn. [6]
6. 1 sc in the next 6 st for 5 rows [6]
7. Adding the new colored dress yarn,
1 sc in the next 6 sts for a total of 3 rows.
8. Refer to Photo J. Do the same for in the round arm and hand.
 |
| Photo K. 2 different arms. On the doll was worked in the round. The unattached done open and sewn to the side. |
 |
| Photo L. Arms added to the body. |
Keep going.....Because now you need to add the head to the body.
Refer to Photos L and M.
 |
| Photo M. Head attached to the body. Isn't she cute? |
 |
| Photo N. Picking up 18 sts around the chest to add the skirt. |
Once the doll is in one form, we need to add the dress.
Now you may make the dress separate and attach or you may just pick up stitches from the chest and
circle around and keep adding all away until you get to size of the skirt size you want. I have done it both ways.
First, let's add it as the photos were shot.
1. I picked up 18 stitsches around.
2. 2 sc in ech of the 18 sts [36]
3. 1 double crochet in the next 36 sc around.
4. Try to continue #3. for 4-5 rows.
5. My last row was just a simple decorative border of shells every other st. You may use your own.
 |
| Photo O. Our adorable doll with her skirt finally added. |
 |
| All she needs is her wavy curly hair. |
Please enjoy this session. You may embellish as much as you like. This is your project. Looking forward to seeing your work. Happy Crocheting! Valis
No comments:
Post a Comment